Many moons ago I needed a way of storing documents online, so they could be shared between users and easily accessed from many locations. Thus, Simple Document Management System was born. SDMS is a PHP based front-end to a MySQL database that allows users to upload and download files into and from virtual directories using only a web browser.
 It was my second ever PHP project and I wrote it in (bad) php3, with only some informal C coding as experience. Needless to say the code was not great, it used globals and had SQL injection problems. Though I did fix these two particular issues, the code is still old and tired and I've not really maintained it for years. Bringing it up to date would probably involve more effort than just scrapping it and rewriting it from scratch.
I've been doing a lot of work with Drupal over the past year and I had been vaguely considering reimplementing SDMS as a Drupal module, thus removing the need for me to also maintain code to handle users, passwords, commenting and permissions.
As I got more familiar with some 3rd party Drupal modules, it struck me that it should be completely possible to implement a document management system similar to SDMS in Drupal. Without doing any coding whatsoever. Thus, SDDMS was born.
The basics: Install Modules
You'll need to enable a few additional core modules and obtain a bunch of third party modules to make this all work. First, go to Administer → Site Building → Modules and enable the Book and Statistics modules. These are not enabled by default, but SDDMS needs them.
When that is done, you will need to grab a dozen of 3rd party modules. I've listed them here. For each one, download the latest stable 6.x tarball. When done, unpack them into the site-wide (sites/all/modules) or per-site (sites/mysite.com/modules) module directory.
- CCK - Allows you to create custom node types.
- Nodereference - Allows you to reference a node from another node (Included with CCK).
- Viewfield - Allows you to reference a view from nodes. (No stable version yet, grab the -dev one)
- Filefield - Allows you to attach files to nodes.
- Filefield meta - Manage attachment file meta information (Included with Filefield).
- Filefield paths - Adds filefield tokens to Pathauto.
- Mimedetect - Detect file attachment meta information.
- Getid3() - Detect media attachment file meta information.
- Pathauto - Automatically create permanent urls for nodes.
- Token - Tokeniser needed to automatically create permanent urls for nodes.
- Views - Create custom displays and listings of content.
- Views UI - Management interface for Views (Included with Views).
When installed, visit Administer → Site Building → Modules again and enable each of these modules. Some need other modules to be enabled and Drupal will first ask and then automatically enable these other modules for you.
Next: Configure the modules
Now that you have installed all required modules, it's time to configure them for use.
Book
The Book module provides us with the tree-like structure we need for directories. Go to Administer → Content Management → Content types and edit Book page. Change the name from Book page to Directory and (optionally) change the description. In Submission Form Settings a bit further down the page, change Title to Name and Body to Description.
CCK: Create a custom content type
You have a directory content type now, but you still lack the ability to upload documents. To rectify this, go to Administer → Content Management → Content types and click Add a new content type. Name this new content type Document, set its type to document and add a description. In Submission Form Settings, change Title to Name and Body to Description, just like you did for the Directory type. Make sure that Promoted to front page is not checked under Workflow settings and save the content type.
Now its time to allow users to put a document in a specific directory and actually upload files. On Administer → Content Management → Content types, click Manage fields for the Document content type.
CCK: Add fields
Set the Label to Directory and add document_directory as the Field name. In the type of data to store, select Node refence and leave the form element on Select list. When done, click Save. On the next page, add optional help text for this field (for instance: "Select a directory to store this document.") and leave the default value as None.
In the global settings section, tick the required box and leave the number of values at 1 - after all, we require each document to live in one directory only. In the Content types that can be referenced listing, check the box for Directory. This will limit the nodes you can reference to directories only.
Click Save field settings to save your changes and return to the Manage fields page.
Now add a field labeled File and named document_file. The type of data to store is File and the form element should be File upload and click Save.
On the next page, add help text (eg: "Choose a file to upload to SDDMS.") and make sure the field for Permitted upload file extension is empty. This will allow your users to upload any kind of file. If you want to limit the kinds of files they can upload, enter a list of permitted file extensions.
Under File Size Restrictions you are able to limit the maximum file size your users may upload. This is blank by default and uploads will be limited by the value of upload_max_filesize in your php.ini file. You can enter a smaller value here to restrict your users more, but you cannot increase the maximum allowed size without editing php.ini.
So that you won't have clashes between uploaded files, you can specify where on the file system they should be stored an with what name. Under Filefield Path Settings, enter sdms/[bookpath]. The latter is a replacement token that is provided by the Token, Pathauto and Filefield Paths modules. Together, they will store any uploaded file in a directory under files/sddms named after the Directory which is listed in this Document. You can get a full listing of available tokens by clicking File path replacement patterns.
To avoid incompatible characters in file and directory names and keep them looking tidy, make sure you check the Cleanup using Pathauto and Convert to lowercase boxes.
For the File name field, you want to do essentially the same thing. Leave the tokens [filefield-onlyname-original].[filefield-extension-original] in place and again check the Cleanup using Pathauto and Convert to lowercase boxes under the File name cleanup settings.
After you check the Required box under global settings and leave both the list and description fields on Disabled, you can click Save field settings.
For the arch-lazy, you can also import the content type definitions from the attached directory and document files.
Views: List documents for a specified directory.
You now have content types that represent documents and directories, but no way of listing the documents that are associated with a given directory. This is where the Views module comes to the rescue. You can use it to generate a list of document nodes without the need to write any PHP code.
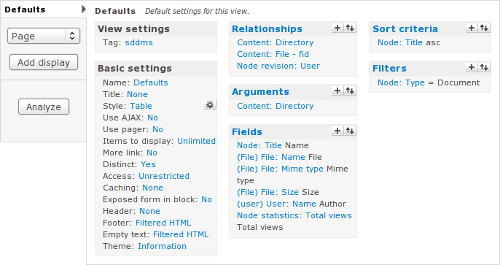
Views: Basic settings
Go to Administer → Site building → Views and click add. Choose a descriptive name for the new view, like list_documents_in_directory and add a concise description. The view type should be Node. When that's done, click next.
This is the main view adminsitative interface. Start by changing some of the basic settings for the new view. Set the style to Table and change Items to display to 0, so all documents will be listed on a single page and set check the Distinct box to prevent duplication from occurring. Make sure to click update after changing each of these settings.
To make it easy for users to add new directories and documents, change the view footer. Check the Display even if view has no result box and add the following HTML code in the text field:
<a href="/node/add/document">Add a document</a> or <a href="/node/add/book">add a directory</a>.
Next, change the empty text to This directory contains no documents and click update again.
To permanently save the changes you just made, click save.
Views: Relationships
Now you'll need to do a bit more advanced configuration. To make sure that only documents for a specific directory are listed by the view and so that some information about the attached file is available, you need to add some relationships. If you know about about SQL, a relationship in Views essentially adds a JOIN clause to the query that Views uses to retrieve data. This makes additional information available for filtering and display.
Start with the link between a document and the directory with which it is associated. Click the + next to Relationships and select Content in the groups pull-down menu. Check the box next to Content: Directory (field_document_directory) and click add. The default label is fine, but ensure the Require this relationship checkbox is checked before you click uUpdate.
Because it would be good to display some file attachment meta-data in the listing, you will also need a File relationship. Click + and again select Content in the groups pull-down. This time, check the box next to Content: File (field_document_file) - fid and click add. This relationship is also required and when you agree that the default label is fine, click update.
Finally, you need a relationship that retrieves the ower of a document. Click + again and select Node revision from the groups list. There is only one field to choose from; Node revision: User. Check its box and click add. Change the label to Author and make sure the Require this relationship checkbox is checked before you click update.
To make the changes to the relationships permanent, click Save.
Views: Arguments
This view is supposed to display the contents of a single directory when a user loads the directory in question. The node ID of a directory can be passed to the view as an argument and we can configure the view to make use of this.
Click the + next to Arguments and select Content from the groups pull-down. The argument we want is a directory, so check the box next to Content: Directory (field_document_directory) and click Add. If a directory has no documents associated with it we need the view to display our empy text, so for Action to take if argument is not present select Display empty text.
Finally, to make sure that the argument for this view is always a directory you can perform argument validation. Select the Node Validator and select Directory as the type. Check the Validate user has access to the node box and set the argument type to Node ID. Change Action to take if argument does not validate to Display empty text and click update, then save.
Views: Fields
Next, add some fields to this view, so it actually displays documents and associated information. Start with the document name.
Click the + after Fields and select Node in the groups pull-down list. Scroll down and check the box next to Node: Title, then click Add. Change the label to Name and check the Link this field to its node box, then click update.
Next, add a field that contains the name of the attached file. Click the + and select File in the groups pull-down. Scroll the list down a bit an check the box next to File: Name, then click add. Change the label to File and use the File relationship to retrieve this field. Click update to add the field to the view.
Repeat the previous step twice to also add the File: Mime type and File: Size fields to the view.
To add the username of the uploader, click the + and select User from the groups pull-down. Scroll down the list a bit and check the box next to User: Name, then click add. On the next page, select the user relationship, change the label to Author, and check the Link this field to its user box. Click update to add the field.
Lastly, add a counter field that shows how many times the document has been viewed. Click the + and select Node statistics from the groups, then click add. This field does not use a relationship, and when you are happy with the label and formatting options, click update.
These are all fields for now, so click save to permanently save your changes.
Views: Sorting and filtering
To make sure the view displays the table of documents in an orderly format, click the + next to Sort criteria. Select Node in the groups pull-down and check the box next to Node: Title in the list, then click add. This sort criterion does not use a relationship and ascending sort order is fine, so click update.
Finally, you want to make sure that this view only lists nodes of the Document type and not Directories, Pages, Stories or any other kind you may add later. Click the + next to Filters and select Node in the groups pull-down. Scroll down the list and check the box next to Node: Type, then click add. You don't need a relationship here either, but you do want to select Is one of as Operator and Document as Node type. When done, click update.
With that done, your view is complete, so click save to make these last changes permanent.
If you want to create this view a bit faster, you can import the PHP code that I created by exporting my copy of this view as well.
CCK Revisted: Add the View
Now that you have a view, you'll need to have it listed on each Directory you access. Go back to Administer → Content Management → Content types and click Manage fields for the Directory content type. Add a new field labeled Documents and named directory_documents. The field type is View field and the form element is select list. When done, click save.
Because you always want to display the same view and disallow your users from changing this field, you should check the Force default box. Also check the Required box and set the number of values to 1.
The allowed views should be limited to the view you just created, list_documents_in_directory. You should also select it in the list under the Documents heading. Finally, you can pass an argument to the view. As you'll recall, the view requires a node ID for a Directory node. That means that as argument here you should enter %nid.
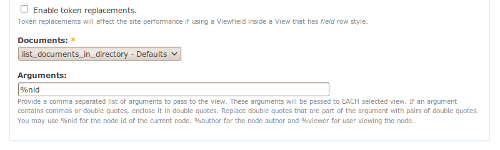
This means that when a Directory is accessed by a user, its node ID is passed to the view and the resulting list of documents is displayed to the user. Click save field settings to finish setting up Drupal.
Nearly there: URL Aliases
To make useful permalinks to your directories and documents, you can have Drupal automaticallty generate URLs based on the names of nodes you create. Go to Administer → Site building → URL aliases and click Automated alias settings.
Under Node path settings you can enter a list of strings and token substitutions you want Drupal to use to generate URLs.
For the Directory type, enter sddms/[bookpath-raw]/[title-raw] and for the Document type enter sddms/[bookpath-raw]/[field_document_directory-title-raw]/[title-raw], then click save configuration.
Finally: Start Uploading
You are now ready to create the first Directory node. Go to Create content → Directory andenter a name and description for your root directory. Under Book outline, be sure to select <create a new book>.
When you save the directory, you'll see that it does not contain any documents, but it does now allow you to add a new directory or document.
Before you start making use of your new Drupal based document management system you will probably want to create a few roles and assign them permissions. You could also use the ACL or Taxonomy Access Control modules to provide more fine-grained access control. You'll probably also want to grab some themes, so you can make your DMS not look like a generic Drupal installation.
Note that you're not limited to a singe root directory, you can create as many as you want and so host multiple document repositories on the same Drupal instance.
TODO: Profile
Something that is still on my TODO list is to provide an install profile, so setting up a new SDDMS instance is as easy as a few mouse clicks. Of course, patches are always welcome ;-)
| Attachment | Size |
|---|---|
| 7.23 KB | |
| 2.69 KB | |
| 4.69 KB |
Comments
Re: Simple Drupal Document Management System
Thanks for the writeup -- extremely helpful. I'm having an issue with the default directory into which each new directory is placed. Whenever I create a new directory, it appears to create itself at the same "level" as the root, rather than *inside* the root. When creating a new directory, I can click "book outline" and, under the "Book" dropdown, change where it goes, but shouldn't the default be the root? Perhaps I've done something wrong along the way.
Re: Simple Drupal Document Management System
EDIT: I see this comment, which appears to deal with the same issue:
http://cafuego.net/2009/07/11/simple-drupal-document-management-system#c...
But I feel like the "drop down book outline and choose the parent directory" step is unnecessary, at least when you're adding a subdirectory directly under the root. Ideally, the "add document" and "add directory" buttons would "know" to add said directory/document to whichever directory you clicked the button on, but at the very least I think the default directory for a new directory should be the root (rather than ). Any way to do either of these things?
Book Tokens Not working?
Know anything about the book tokens not working properly?
Everything works great except for when files are uploaded filefield paths module is not responding to the [bookpath] token. I have tested other tokens aside from book and also manually entered in folder paths with success.
Any suggestions or thought as to why the book tokens arent working?
Thanks for such a great article.
Re: Book Tokens Not working?
Hmm, not offhand. I suppose it's possible they were renamed in an update to the Token module. Are the ones I've used still listed in the suggested replacement options for the fields in question?
Need actual uploaded files in sub directories on server.
I have seen the post about getting the actual uploaded files in the server sub-directories ( files/sddms/subdirectory) and am not sure why this is not done. I have never used the book module so I may not be up on this. However it would be very useful to have the uploaded files be in the server sub directory under sddms as is shown within the drupal system. Is there a reason why this document management system cannot do this?
Re: Need actual uploaded files in sub directories on server.
It can - you just need to use the correct Token in the configuration field that is provided by the FileField Paths module.
Re: Simple Drupal Document Management System
Hi man,
Really great article !
Could you upgrade it to Drupal 7 ?
Many changes to include, CCK is build-in now for example...
Ty !
Re: Simple Drupal Document Management System
Drupal is the context between WP and Joomla. If you’re perfect with HTML and interested to build flash websites, then drupal is the place for you. I’m a newbie to Drupal CMS. This tutorial helped is of great help.
Final steps
Firstly, thanks for a great tutorial. I have had so much trouble with several other tutorials being a Drupal n00b, as they seem presumptious in details, where as your tutorial is the first truly step by step tutorial I have found.
Once I had completed the tutorial, I still needed a couple of steps to deliver this to my end users.
I had to create the root directory. I then went to create subdirectories and wondered why they did not appear in the root directory. Your tutorial states to put the following HTMl in the footer:
Add a document or add a directory
I changed this to the following to get it to work:
Add a document or add a directory
Secondly, I then created a menu item for the document manager and set permissions on it.
Very impressive solution and easy to follow tutorial.
Oh wow, you're totally right.
Oh wow, you're totally right. Nobody ever noticed before - or pointed out - that that directory link was wrong. Thankyou! :-)
Drupal 7 update
Good Morning:
I stumbled upon this post today, and it seems like it will fit my exact need. My only issue, this appears to be a module for Drupal 6. Any updates for Drupal 7?
node statistic
Firstly, thank you for sharing this info with us.
I am doing an exercise, see http://noizrecords.com. I am trying to implement the view you have here defined. For the section "Views Fields", I can't find "node statistic" from the group drop-down. Am I missing a module?
Thank you again for the time you've put into this
node statistics
Hi,
I found it in core Drupal.
Any chance this has been done in drupal 7?
Any chance this has been done in drupal 7?
Add new comment