Many moons ago I needed a way of storing documents online, so they could be shared between users and easily accessed from many locations. Thus, Simple Document Management System was born. SDMS is a PHP based front-end to a MySQL database that allows users to upload and download files into and from virtual directories using only a web browser.
 It was my second ever PHP project and I wrote it in (bad) php3, with only some informal C coding as experience. Needless to say the code was not great, it used globals and had SQL injection problems. Though I did fix these two particular issues, the code is still old and tired and I've not really maintained it for years. Bringing it up to date would probably involve more effort than just scrapping it and rewriting it from scratch.
I've been doing a lot of work with Drupal over the past year and I had been vaguely considering reimplementing SDMS as a Drupal module, thus removing the need for me to also maintain code to handle users, passwords, commenting and permissions.
As I got more familiar with some 3rd party Drupal modules, it struck me that it should be completely possible to implement a document management system similar to SDMS in Drupal. Without doing any coding whatsoever. Thus, SDDMS was born.
The basics: Install Modules
You'll need to enable a few additional core modules and obtain a bunch of third party modules to make this all work. First, go to Administer → Site Building → Modules and enable the Book and Statistics modules. These are not enabled by default, but SDDMS needs them.
When that is done, you will need to grab a dozen of 3rd party modules. I've listed them here. For each one, download the latest stable 6.x tarball. When done, unpack them into the site-wide (sites/all/modules) or per-site (sites/mysite.com/modules) module directory.
- CCK - Allows you to create custom node types.
- Nodereference - Allows you to reference a node from another node (Included with CCK).
- Viewfield - Allows you to reference a view from nodes. (No stable version yet, grab the -dev one)
- Filefield - Allows you to attach files to nodes.
- Filefield meta - Manage attachment file meta information (Included with Filefield).
- Filefield paths - Adds filefield tokens to Pathauto.
- Mimedetect - Detect file attachment meta information.
- Getid3() - Detect media attachment file meta information.
- Pathauto - Automatically create permanent urls for nodes.
- Token - Tokeniser needed to automatically create permanent urls for nodes.
- Views - Create custom displays and listings of content.
- Views UI - Management interface for Views (Included with Views).
When installed, visit Administer → Site Building → Modules again and enable each of these modules. Some need other modules to be enabled and Drupal will first ask and then automatically enable these other modules for you.
Next: Configure the modules
Now that you have installed all required modules, it's time to configure them for use.
Book
The Book module provides us with the tree-like structure we need for directories. Go to Administer → Content Management → Content types and edit Book page. Change the name from Book page to Directory and (optionally) change the description. In Submission Form Settings a bit further down the page, change Title to Name and Body to Description.
CCK: Create a custom content type
You have a directory content type now, but you still lack the ability to upload documents. To rectify this, go to Administer → Content Management → Content types and click Add a new content type. Name this new content type Document, set its type to document and add a description. In Submission Form Settings, change Title to Name and Body to Description, just like you did for the Directory type. Make sure that Promoted to front page is not checked under Workflow settings and save the content type.
Now its time to allow users to put a document in a specific directory and actually upload files. On Administer → Content Management → Content types, click Manage fields for the Document content type.
CCK: Add fields
Set the Label to Directory and add document_directory as the Field name. In the type of data to store, select Node refence and leave the form element on Select list. When done, click Save. On the next page, add optional help text for this field (for instance: "Select a directory to store this document.") and leave the default value as None.
In the global settings section, tick the required box and leave the number of values at 1 - after all, we require each document to live in one directory only. In the Content types that can be referenced listing, check the box for Directory. This will limit the nodes you can reference to directories only.
Click Save field settings to save your changes and return to the Manage fields page.
Now add a field labeled File and named document_file. The type of data to store is File and the form element should be File upload and click Save.
On the next page, add help text (eg: "Choose a file to upload to SDDMS.") and make sure the field for Permitted upload file extension is empty. This will allow your users to upload any kind of file. If you want to limit the kinds of files they can upload, enter a list of permitted file extensions.
Under File Size Restrictions you are able to limit the maximum file size your users may upload. This is blank by default and uploads will be limited by the value of upload_max_filesize in your php.ini file. You can enter a smaller value here to restrict your users more, but you cannot increase the maximum allowed size without editing php.ini.
So that you won't have clashes between uploaded files, you can specify where on the file system they should be stored an with what name. Under Filefield Path Settings, enter sdms/[bookpath]. The latter is a replacement token that is provided by the Token, Pathauto and Filefield Paths modules. Together, they will store any uploaded file in a directory under files/sddms named after the Directory which is listed in this Document. You can get a full listing of available tokens by clicking File path replacement patterns.
To avoid incompatible characters in file and directory names and keep them looking tidy, make sure you check the Cleanup using Pathauto and Convert to lowercase boxes.
For the File name field, you want to do essentially the same thing. Leave the tokens [filefield-onlyname-original].[filefield-extension-original] in place and again check the Cleanup using Pathauto and Convert to lowercase boxes under the File name cleanup settings.
After you check the Required box under global settings and leave both the list and description fields on Disabled, you can click Save field settings.
For the arch-lazy, you can also import the content type definitions from the attached directory and document files.
Views: List documents for a specified directory.
You now have content types that represent documents and directories, but no way of listing the documents that are associated with a given directory. This is where the Views module comes to the rescue. You can use it to generate a list of document nodes without the need to write any PHP code.
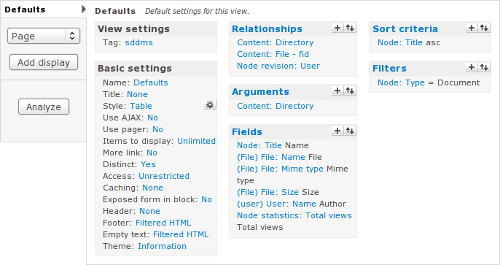
Views: Basic settings
Go to Administer → Site building → Views and click add. Choose a descriptive name for the new view, like list_documents_in_directory and add a concise description. The view type should be Node. When that's done, click next.
This is the main view adminsitative interface. Start by changing some of the basic settings for the new view. Set the style to Table and change Items to display to 0, so all documents will be listed on a single page and set check the Distinct box to prevent duplication from occurring. Make sure to click update after changing each of these settings.
To make it easy for users to add new directories and documents, change the view footer. Check the Display even if view has no result box and add the following HTML code in the text field:
<a href="/node/add/document">Add a document</a> or <a href="/node/add/book">add a directory</a>.
Next, change the empty text to This directory contains no documents and click update again.
To permanently save the changes you just made, click save.
Views: Relationships
Now you'll need to do a bit more advanced configuration. To make sure that only documents for a specific directory are listed by the view and so that some information about the attached file is available, you need to add some relationships. If you know about about SQL, a relationship in Views essentially adds a JOIN clause to the query that Views uses to retrieve data. This makes additional information available for filtering and display.
Start with the link between a document and the directory with which it is associated. Click the + next to Relationships and select Content in the groups pull-down menu. Check the box next to Content: Directory (field_document_directory) and click add. The default label is fine, but ensure the Require this relationship checkbox is checked before you click uUpdate.
Because it would be good to display some file attachment meta-data in the listing, you will also need a File relationship. Click + and again select Content in the groups pull-down. This time, check the box next to Content: File (field_document_file) - fid and click add. This relationship is also required and when you agree that the default label is fine, click update.
Finally, you need a relationship that retrieves the ower of a document. Click + again and select Node revision from the groups list. There is only one field to choose from; Node revision: User. Check its box and click add. Change the label to Author and make sure the Require this relationship checkbox is checked before you click update.
To make the changes to the relationships permanent, click Save.
Views: Arguments
This view is supposed to display the contents of a single directory when a user loads the directory in question. The node ID of a directory can be passed to the view as an argument and we can configure the view to make use of this.
Click the + next to Arguments and select Content from the groups pull-down. The argument we want is a directory, so check the box next to Content: Directory (field_document_directory) and click Add. If a directory has no documents associated with it we need the view to display our empy text, so for Action to take if argument is not present select Display empty text.
Finally, to make sure that the argument for this view is always a directory you can perform argument validation. Select the Node Validator and select Directory as the type. Check the Validate user has access to the node box and set the argument type to Node ID. Change Action to take if argument does not validate to Display empty text and click update, then save.
Views: Fields
Next, add some fields to this view, so it actually displays documents and associated information. Start with the document name.
Click the + after Fields and select Node in the groups pull-down list. Scroll down and check the box next to Node: Title, then click Add. Change the label to Name and check the Link this field to its node box, then click update.
Next, add a field that contains the name of the attached file. Click the + and select File in the groups pull-down. Scroll the list down a bit an check the box next to File: Name, then click add. Change the label to File and use the File relationship to retrieve this field. Click update to add the field to the view.
Repeat the previous step twice to also add the File: Mime type and File: Size fields to the view.
To add the username of the uploader, click the + and select User from the groups pull-down. Scroll down the list a bit and check the box next to User: Name, then click add. On the next page, select the user relationship, change the label to Author, and check the Link this field to its user box. Click update to add the field.
Lastly, add a counter field that shows how many times the document has been viewed. Click the + and select Node statistics from the groups, then click add. This field does not use a relationship, and when you are happy with the label and formatting options, click update.
These are all fields for now, so click save to permanently save your changes.
Views: Sorting and filtering
To make sure the view displays the table of documents in an orderly format, click the + next to Sort criteria. Select Node in the groups pull-down and check the box next to Node: Title in the list, then click add. This sort criterion does not use a relationship and ascending sort order is fine, so click update.
Finally, you want to make sure that this view only lists nodes of the Document type and not Directories, Pages, Stories or any other kind you may add later. Click the + next to Filters and select Node in the groups pull-down. Scroll down the list and check the box next to Node: Type, then click add. You don't need a relationship here either, but you do want to select Is one of as Operator and Document as Node type. When done, click update.
With that done, your view is complete, so click save to make these last changes permanent.
If you want to create this view a bit faster, you can import the PHP code that I created by exporting my copy of this view as well.
CCK Revisted: Add the View
Now that you have a view, you'll need to have it listed on each Directory you access. Go back to Administer → Content Management → Content types and click Manage fields for the Directory content type. Add a new field labeled Documents and named directory_documents. The field type is View field and the form element is select list. When done, click save.
Because you always want to display the same view and disallow your users from changing this field, you should check the Force default box. Also check the Required box and set the number of values to 1.
The allowed views should be limited to the view you just created, list_documents_in_directory. You should also select it in the list under the Documents heading. Finally, you can pass an argument to the view. As you'll recall, the view requires a node ID for a Directory node. That means that as argument here you should enter %nid.
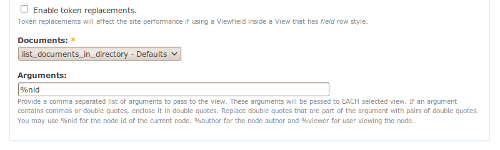
This means that when a Directory is accessed by a user, its node ID is passed to the view and the resulting list of documents is displayed to the user. Click save field settings to finish setting up Drupal.
Nearly there: URL Aliases
To make useful permalinks to your directories and documents, you can have Drupal automaticallty generate URLs based on the names of nodes you create. Go to Administer → Site building → URL aliases and click Automated alias settings.
Under Node path settings you can enter a list of strings and token substitutions you want Drupal to use to generate URLs.
For the Directory type, enter sddms/[bookpath-raw]/[title-raw] and for the Document type enter sddms/[bookpath-raw]/[field_document_directory-title-raw]/[title-raw], then click save configuration.
Finally: Start Uploading
You are now ready to create the first Directory node. Go to Create content → Directory andenter a name and description for your root directory. Under Book outline, be sure to select <create a new book>.
When you save the directory, you'll see that it does not contain any documents, but it does now allow you to add a new directory or document.
Before you start making use of your new Drupal based document management system you will probably want to create a few roles and assign them permissions. You could also use the ACL or Taxonomy Access Control modules to provide more fine-grained access control. You'll probably also want to grab some themes, so you can make your DMS not look like a generic Drupal installation.
Note that you're not limited to a singe root directory, you can create as many as you want and so host multiple document repositories on the same Drupal instance.
TODO: Profile
Something that is still on my TODO list is to provide an install profile, so setting up a new SDDMS instance is as easy as a few mouse clicks. Of course, patches are always welcome ;-)
| Attachment | Size |
|---|---|
| 7.23 KB | |
| 2.69 KB | |
| 4.69 KB |
Comments
Nice
This is a nice write-up. I think drupal's capabilities as a document management system are mostly overlooked. I have set up a more specialized document management system using drupal for a corporate intranet and it works nicely.
Thank you for taking the time to write this.
great article
Hi ..i have been exploring several possiblities i.e via core upload, webfm. Putting things together different modules to meet our requirement is not an easy task. I.e I like the webfm drag and drop features, but currently it's not integrated with Views. Furthermore, I need to integrate with OG. filefield via cck is another option, I will look into next :-)
kswan mind sharing your "more specialized document management system" ?
sure
What I meant by my "more specialized document management system" is that I set up a content type that has several filefields and text fields that are relevant for a certain document package that we use all the time. This is used in a corporate intranet.
I hope that helps.
more specialised dms
Yep, my blog pretty much only covers the basics. However, once you have that going you can add any number of additional fields and taxonomies to your document (and directory) node types.
Thanks!
Hi there. I really appreciate your tutorial. It is well-laid out and easy to follow along. I had no problems until I got to the CCK:revisted section.
I do not have "View Field" as an option for the field. I am not sure if this is a setting I have missed somewhere. Any ideas?
Thanks again,
Michael
viewfield
Hi Michael,
The View Field is provided by an add-on module, can you check that this module is installed and that you have permission to use it? You can find it at http://drupal.org/project/viewfield
Oops!
I thought I had checked that all of the listed modules were installed - oh well. Thanks for the help. I can't wait to begin using this!
SQL Error
I have been through this (excellent) tutorial and get the following error:
user warning: You have an error in your SQL syntax; check the manual that corresponds to your MySQL server version for the right syntax to use near 'DISTINCT(node.nid), node.title AS node_title, files_node_data_field_docume' at line 1 query: SELECT DISTINCT(node.nid) AS DISTINCT(node.nid), node.title AS node_title, files_node_data_field_document_file.filename AS files_node_data_field_document_file_filename, files_node_data_field_document_file.filemime AS files_node_data_field_document_file_filemime, files_node_data_field_document_file.filesize AS files_node_data_field_document_file_filesize, users_node_revisions.name AS users_node_revisions_name, users_node_revisions.uid AS users_node_revisions_uid, node_counter.totalcount AS node_counter_totalcount FROM node node LEFT JOIN content_type_document node_data_field_document_directory ON node.vid = node_data_field_document_directory.vid INNER JOIN node node_node_data_field_document_directory ON node_data_field_document_directory.field_document_directory_nid = node_node_data_field_document_directory.nid LEFT JOIN content_type_document node_data_field_document_file ON node.vid = node_data_field_document_file.vid INNER JOIN files files_node_data_field_document_file ON node_data_field_document_file.field_document_file_fid = files_node_data_field_document_file.fid LEFT JOIN node_revisions node_revisions ON node.vid = node_revisions.vid INNER JOIN users users_node_revisions ON node_revisions.uid = users_node_revisions.uid LEFT JOIN node_counter node_counter ON node.nid = node_counter.nid WHERE (node.type in ('document')) AND (node_data_field_document_directory.field_document_directory_nid = 18) ORDER BY node_title ASC in C:\wamp\www\intranet\sites\all\modules\views\includes\view.inc on line 759.
What did I do wrong?
MySQL error
You did nothing wrong, I think.
It looks like your Views module is inserting the keyword DISTINCT in a field alias, which it really shouldn't be doing. Your query starts with:
and that should be:
Which version of the Views module are you using? I'm using 6.x-2.6 and it behaves properly.
MySQL error
Thanks. It was the views module. I replaced it with views-6.x-3.x-dev and it worked just fine.
404 error message
Hi, I am completely and utterly new to Drupal. In fact, your tutorial was the reason I gave up on Joomla and moved to Drupal! Thanks for taking the time.
Anyway, I have a problem in that after I create my first directory and try to upload a document I get an error 404: object not found message.
Here are some bits of your tutorial I didn't follow perfectly:
"CCK: Add fields
"Set the Label to Directory and add document_directory as the Field name. In the type of data to store, select Node refence and leave the form element on Select list. When done, click Save. On the next page, add optional help text for this field (for instance: "Select a directory to store this document.") and leave the default value as None."
- For this section I didn't have the 'node reference' option and so I used 'view field' instead, as my only other option, assuming it was the same thing under a different name (blushes...)
"For the File name field, you want to do essentially the same thing. Leave the tokens [filefield-onlyname-original].[filefield-extension-original] in place and again check the Cleanup using Pathauto and Convert to lowercase boxes under the File name cleanup settings."
- I couldn't find these options anywhere.
"Under Filefield Path Settings, enter sdms/[bookpath]"
I left any instructions containing sdms or sddms out for the moment, because I don't know what I'm calling the intranet yet.
Any help would be massively appreciated. Hope I have given the right info.
Came back this morning and
Came back this morning and the problem had resolved itself. Odd.
errors and missing options
You will need the nodereference module to be installed with correct permissions to be able to use it when creating the document node type. Replacing the directory link with a viewfield will not work.
The same goes for the token and pathauto settings, You can set the correct options as long as you created a filefield and have the required modules installed with correct permissions.
Subdirectories not showing
Dear cafuego,
thanks a lot for your marvellous tutorial to set up your SDDMS, I am very happy with it, almost everything works perfectly fine.
Besides ...
After having created a main book with some directories, I'd like to create further subdirectories in those existing directories in which I would place documents, for example a hierarchy such as
A main Book called ZOO
> directory: ANIMALS
> > (sub)directory: REPTILS
> > > document: Snake (p.e. with snake.doc attached)
> > > document: Lizard (p.e. with llizard.pdf attached ...)
> > (sub)directory: BIRDS
> > > document: Eagle (with eagle.pdf)
> > > document: Flamingo (with flamingo.jpg)
My problem now: I can create easily create this kind of hierarchy with your SDDMS, all items exist as content, but the subdirectories (with its content) are not shown as items of the mother directory one levle higher. They just don't appear, only documents of directories are shown. I just don't know why, is this a problem of the defined view?
As I am completely unfamiliar with Drupal and generally have problems to exactly follow the steps you proposed to configure SDDMS (thank god you explained every single step such precisely) - I have no clue, what and where to try to receive the desired result.
Do you have any hint on how to get shown those subdirectories, when viewing the directories' content?
Thanks again,
Felix
Hi, I have the same
Hi,
I have the same problem... :S
Re: Subdirectories
The view that I added in the tutorial only lists documents. The listing of directories is done automagically by the Book module, but *only* if you select the correct parent item when you create a subdirectory.
E.g: When you create a directory, make sure that under Book Outline you first select the appropriate root directory from the Book pull-down, then also select the Parent Item you want the new directory to be listed under.
The subdirectories will not be listed in the same listing as the files, but in a simple HTML list below the files.
You could overrides this by creating a new View for directories and styling it as you want. However, I don't know whether it's possible to create a single unified View that lists both files and directories in a single table.
Thanks, cafuego!
Thanks, cafuego!
404 Error
New to Drupal. Followed your very well written outline. Came to adding files, and when I click on the "add a file" link, I get a 404 Error page. Any thoughts?
Re: 404 Error
The actual link to add files depends on the name you give the document content type. If the machine readable name is 'document' the path would be /node/add/document. If the machine readable name is 'file' then the path would be /node/add/file.
Thanks!
I've been looking for a Drupal DMS module, or some pointers in how to create one. Being new to Drupal, I thought it possible using views etc, but had no idea how to go about implementing it, so thank you very much for the tutorial!
All DMS's that I've looked at seem to require you to import and store your docs in its repository. However, as we already have a dedicated file server (Win2003) and I would like to simply be able to navigate these shared resources from within Drupal/DMS and open them in their associated program. Is this possible with SDDMS?
Use fileshare folder
Unfortunately, no.
SDDMS does use the filesystem to store its documents, but all meta-data and relational data is stored within the Drupal tables in the database.
If the file share is accessible by the web user that runs Drupal, you might be able to find or write a module that can scan the directories on the share and format and display the output to your users.
Thanks & 404
Thanks for this very useful tutorial. As it s my first try of drupal I can see how it s powerful but also how it needs a huge knowledge to be able to do what we need.
Also for 404 error, you need to adpat the path to your installation, and if drupal is not at the root of your webserver, you need to change links in view's footer to prefix it with the full path of your install.
Groups drop-down does not contain Content
Hi,
I've followed this excellent way of creating a SDDMS in Drupal, however, while creating the view relationships (Click the + next to Relationships and select Content in the groups pull-down menu) I can't see "Content" in the drop down, I see only the following values in the drop down: All, Book, Comment, Node Revision.
What should I be doing in order to get the "Content" in the Groups drop-down?
Thanks,
Ram
Re: Groups drop-down does not contain Content
Content in that drop-down list is provided by the CCK module .. so that should be installed and you need to be able to access the field in question, I believe.
Why book module?
hi,
really great to see such a detailed instruction for especially newbies ... but for more advanced people as well.
When i started testing with drupal over a 2 years ago, a lot of these functionalities were not possible, and i failed in finding any receipt like yours, cause things obviously were too complicated then.
So its great to finally see such a nice howto.
Just one thing i'm wondering about is your usage of that horrible book module.
I think most people will be confused to read about book outline and other book related stuff when dealing with document categories.
Did you ever consider using taxonomy for the categorization? There are so many nice helpers for taxonomies around these days. And actually i think taxonomy is the real strength of drupal which makes content categorization so much more intuitive and easy.
So, are there any important reasons for using book instead of taxonomy for your project?
cheers
bernd
Re: Why book module?
I was after a module that would give me a tree structure for content right out of the box. I decided book would be easiest for that, as it wouldn't need any views to display the directories (books). Of course I could've used a hierarchical taxonomy and created views to display those as directories ... but that would add complexity, and that's not the point of the exercise :-)
Owesome!!
This article is awesome.One feature request:if this directory listing will have permissions then it would be great, means each directory have permission that who can see this directory.if any one have idea how to implement this feature then please inform me at: chintan.vyas89@gmail.com.
Regards,
Chintan Vyas.
Re: Awesome!!
Hi Chintan,
The easy way to do this would be via any of the access control modules currently in Drupal. For instance http://drupal.org/project/tac_lite or http://drupal.org/project/content_access . Just tweak permissions for specific users or roles on any of the directory nodes.
The very hard way would be adding a userreference field to each directory node, which would contain the users that are allowed to access the directory in question. You can then join (view argument) these in the document list query and see if the logged in user occurs in the directory/user field.
Hi cafuego, Nice tutorial. My
Hi cafuego,
Nice tutorial. My simple document management system is now working.
Now I wonder, how can I give any authenticated users permission to upload, because I don't see any upload option?
Administer -> User Management -> User Settings -> ?
But when I logged in as root, the upload option is visible.
Upload problem
Hmm. See if authenticated users have upload permission: index.php?q=admin/user/permissions#module-upload
Attach file in comment
Thanks. Now it's possible to upload.
BTW, is it possible to attach file in the post comment?
Let's say I post my work plan document. Then my colleague will revise and it attach the updated version in hist comment.
Re: Attach file in comment
In theory yes, via the nodecomments module.
In practice, just attach a new file to the document - that's much easier. You can always change the theme to show only the last file by default.
You rock!
I just wanted to give you a big "Thumbs Up"!!! This tutorial is great!!! Do you have a PayPal account or something that I could shoot a few bucks your way. This really helped me with a site I made for a group moving from a Yahoo! Group. I need some form of DMS that was at least as nice as the Yahoo! Groups one.
This one is better, but then again it is Drupal!
Thanks again!
I rock
Wow, thank you :-) If you want to donate, please donate to the Drupal association, that way it benefits the project and not just me.
Cheers!
No phyical directory created ?
I have followed carefully your guide and things are looking as they should from Drupal. I mean, I can see my documents under such and such directory, so on and so forth.
I have created ANIMAL as the root directory
then created another two directories under ANIMAL. These are INSECTS and REPTILES.
under INSECTS, I uploaded a jpg file, ants.jpg
All fine in Drupal.
Under Linux filesystem, I can see that the sddms directory was created under ~/files.
The file ants.jpg is there, But there's no INSECTS and REPTILES directories !
Am I doing this correct OR there should be a PHYSICAL directories named INSECTS and REPTILES ?
Please advise.
Re: No phyical directory created ?
No, there isn't supposed to be any physical directories.
Multilingue
Nice tutorial!
It's working like a charm but now i have a problem.
Out to translate contect so diferent users, with diferente languages, can use it, and upload doc always to the same dir?
Thanks
Error adding
When I try to add a directory or document I get:
Internal Server Error
The server encountered an internal error or misconfiguration and was unable to complete your request.
Please contact the server administrator, webmaster@townandschoolsoftware.com and inform them of the time the error occurred, and anything you might have done that may have caused the error.
More information about this error may be available in the server error log.
Additionally, a 500 Internal Server Error error was encountered while trying to use an ErrorDocument to handle the request.
I don't find anything helpful in my drupal logs.
Hmm, that's something you
Hmm, that's something you will need to check the web server error.log for.
Without know what was logged, I can't really say what the problem might be, though an initial suspect would be mod_security. If that sees content that it doesn't like in a POST request, it will generate a 500 error.
Re: Error adding
I had the same problem, but I checked the URL udes when creating a new document (Create content-- create document) and I saw it uses "/drupal/node/add/document" instead of /node/add/document". So I put "/drupal/node/add/document" in the HTML footer in the Views: Basic Settings step.
Re: Simple Drupal Document Management System
I am new to Drupal but manage to go through your tutorial and set up this dms.
I have question if I want to have a way to send this document links to friend. How can I set up a view hook(?) Can I create my own module and add a function called myviewname_view_alter?
Upload trouble...
First of all... many thanks for this tutorial.
On my site the first issue I had was that when i was trying to ad a directory or document, the server replied with an error telling me he couldn't find '/node/add/document' nor '/node/add/directory'.
I added the following in front of the command and it started working '?q=/node/add/directory' and 'q=/node/add/directory'. I saw that this was the line coming up in my toolbar when i was adding manually a book or a bookpage.
But now when this works, i can add a directory whith the link in the footer and i can go the add document page . But if i enter a document title , description and upload a file it hangs the page on this upload.
The activity keeps spinning around but nothing happens.
Returning to my homepage results in quiting the document page and rejecting all changes.
Any idea..??
Re: Simple Drupal Document Management System
Thank you for everything I've followed all the steps but not if I do something wrong, I think a book and then a document associated with this book ... but I can see the list that we have created with "views"
Re: Simple Drupal Document Management System
Thanks for the great writeup - very concise and clear instructions!
no File field in dropdown
I got up to here:
Now add a field labeled File and named document_file. The type of data to store is File and the form element should be File upload and click Save.
There are several items in the dropdown box but File is not there.
I checked that I have the nodereference module installed. It is.
I have :
decimal
float
integer
node reference
text
user reference
viewfield
No 'File' in the list.
Where to from here?
Re: no File field in dropdown
Hi vk3cfi,
You're missing the FileField module if 'File' is not an option. Make sure you have downloaded it and that it's enabled in the module list on your Drupal.
Re: no File field in dropdown
True. Thanks. This now works.
Now, is it 'sdms' or 'sddms'?
You wrote: Under Filefield Path Settings, enter sdms/[bookpath]. The latter is a replacement token that is provided by the Token, Pathauto and Filefield Paths modules. Together, they will store any uploaded file in a directory under files/sddms named after the Directory which is listed in this Document.
Re:
Aah that's a typo. You can pick either, as long as you're consistent within your Drupal site.
Re: Simple Drupal Document Management System
Great site! First time the build worked great, your instructions were perfect :)
I have been fooling with the relationships and view fields, trying to have the ability to track and show each person that has accessed a document within the library. (and also who hasnt yet if things go well)
Any suggestions on this?
thank you again for the great how-to, you have no idea how great this to me!
Re: Simple Drupal Document Management System
I have created another system, when i have more times if you want i post it here, or i can send you to see if you like.
Add new comment